
Bee-Bot is one of our well-loved programmable floor robot. In this blog, you find information and links to everything you need to know about Bee-Bot, from switching it on and frequently asked questions, to lesson ideas and customer experiences. So, let’s get started!
What is a Bee-Bot and how can I use it in my setting?

Bee-Bot is a hands-on and versatile programmable robot that can be used across a range of subjects in both Key Stage 1 and 2. With its fun and friendly looks, it immediately appeals to children and is easy-to-use. It allows children to quickly develop their skills in position, direction and movement.
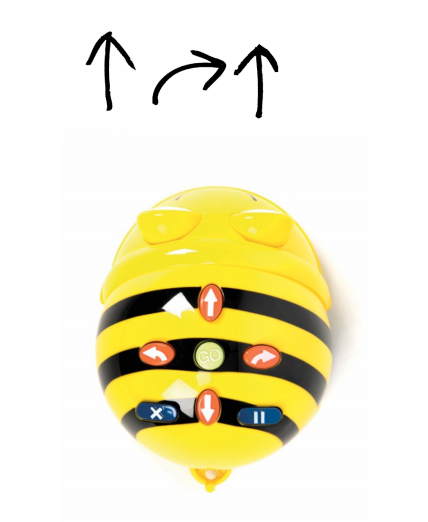
Bee-Bot’s simple programmable buttons allow children to command it to move in set sequences. The robot can be programmed to move forwards, backwards, and turn 90 degrees to the left and right. Additionally, there are a variety of accessories available too, which increases its functionality and enhances the learning experience.
Designed to be used on a flat surface, it is most suited to an indoor environment and preferably allowed to ‘buzz’ around on the floor. On a suitably dry day, however, the Bee-Bot could be used outside on a smooth surface. Just remember to bring it back inside afterwards!
To learn more about Bee-Bot and why it was developed, read our Bee-Bot – the story behind our TTS developed programmable robot.
How can I use Bee-Bot to teach the Computing Curriculum?
Previous Experiences
Prior to using Bee-Bot, children may have worked with our Glow and Go Bot and/or remote control vehicles. Remote control vehicles can help develop an understanding of action, reaction and directional language. Bee-Bot offers a good route into very early programming.
Bee-Bot is an excellent tool for teaching computing in both Key Stage 1 and 2 in a fun and memorable way. It can be used to teach the essential skills of computer programming, including creating basic algorithms, debugging, abstraction and logic.
As a hands-on and user-friendly tool, children can take ownership of their learning when using Bee-Bot, encouraging them to problem solve and thick critically independently.
Children can also be easily progressed onto more complex programming, since Bee-Bot can remember up to 40 steps on older models and up to 200 steps on newer ones.
KS1 Computing – Bee-Bot can be used to help pupils:
- Understand what algorithms are, how they are implemented as programs on digital devices, and that programs execute by following precise and unambiguous instructions
- Create and debug simple programs
- Use logical reasoning to predict the behaviour of simple programs
KS2 Computing – Bee-Bot can be used to help pupils:
- Design, write and debug programs that accomplish specific goals, including controlling or simulating physical systems; solve problems by decomposing them into smaller parts
The National Curriculum for Computing references (above) are indicative of some aspects of the curriculum the activities cover. They are not an exhaustive list nor do they indicate that one activity fully covers that curriculum area. The activities support children in learning computing skills and applying computational thinking. Using BeeBot will help children engage in open-ended problems which require the use of decomposition, modelling and algorithms.
How does Bee-Bot work?
Bee-Bot has been designed with children in mind and is easy to use. It is operated screen-free, using the command buttons on the device itself. For an easy to use guide, download our Bee-Bot User Guide which provides essential information on how to charge the device, switch it on, and utilise the main features.
Using the Bee-Bot App
The free downloadable Bee-Bot is an excellent introduction for children to understand the controls of the Bee-Bot robot, before they begin programming it directly. The app replicates the robot’s controls, allowing young learners to engage with coding concepts in a fun and interactive way.
If children have prior experience with programming Bee-Bot robots, playing some of the more advanced games on the app is an effective way to enhance their programming skills. See our Bee-Bot App Guide for further information about the benefits of using the app, how the app has been designed and how to navigate it effectively.
Progression
The activities listed below are in a suggested order of progression. The time you spend on each activity will vary depending on the children’s abilities. It may also be necessary to break some of the activities down further to suit children’s needs.
For more free downloadable resources to support the teaching of computing using Bee-Bots, see the end of this blog.
Key Focus 1 – Experimenting
Children love to explore and investigate.
Introduce Bee-Bot and discuss the following:
- What do they think is inside?
- What do the buttons do?
- Do the symbols/writing on the buttons give them any clues?
- If you press a button several times, what happens?
- To make something happen, what order do you press the buttons in?
In small groups, give children time to explore Bee-Bot and try out the buttons. After investigation, ask more questions:
- When you press the button again, after Bee-Bot has moved, what happens?
- How far does it move on each press of the forward or backward button?
- How far does it turn left or right?
- How do you clear Bee-Bot’s memory to start again?
Hint: Suggest the children start Bee-Bot from the same point each time.
Develop the activity by providing the children with mats. Which squares can Bee-Bot reach with 3, 4 or 5 button presses?

Key Focus 2 – Challenges
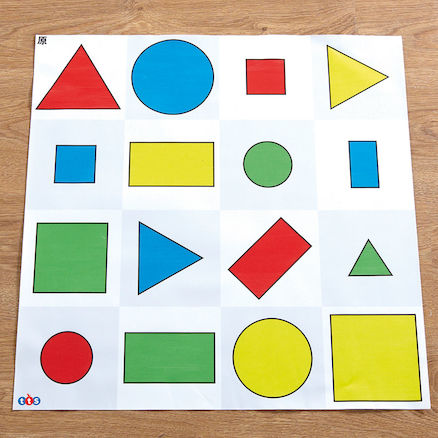
Use Bee-Bot mats to set simple challenges. If possible start with a straight mat, such as the number mat shown right. Children need only use the forward and backward commands. Using a linear numbered mat will encourage children to count on and back. Next, move on to square mats such as the shape mat and introduce turns. Can children make Bee-Bot move from one destination to another? Initially these challenges should be fairly simple. They may be differentiated to suit different children, i.e. shorter or longer distances, involving more or less turns. Children should solve them through trial and error, i.e. enter the commands and press GO. Does Bee-Bot reach the destination? If not, should they add more commands or do they need to clear Bee-Bot’s memory and try again? Children may need reminding to put Bee-Bot back to the start for each try.
After several challenges set by the teacher, children should set them for each other.

Key Focus 3 – Algorithms
Having spent time exploring how Bee-Bot works, children should begin to solve problems through planned solutions rather than a trial and error approach. Challenges may be set by teachers or peers. Working in pairs children should write down their solution to a challenge. They should record the commands and the sequence in which they are needed. They might record their algorithm by drawing the command symbols on a piece of paper or a dry wipe board.
Once a program has been planned, children will need to try it out. If they discover it doesn’t work, they should look back at their plan and ‘debug’ their program, i.e. work out where it went wrong and what they need to do to fix it.
Key Focus 4 – Debugging
Debugging was introduced in the previous Key Focus. Children should be encouraged to solve or create ever more complex challenges using Bee-Bot. For each challenge they should plan, test and debug their solution. As an alternative to drawing their program, children could use cards with the command symbols printed on. The cards should be laid out in the order they think will solve the challenge. When debugging they may need to switch cards around or add additional cards to their program.
Key Focus 5 – Prediction
After writing their own Bee-Bot programs and debugging them, children can start to read programs created by other people. These may be written by a teacher, other children or even randomly generated, using cards (shown above). The student need to know Bee-Bot’s starting point and which program to use. They should go through the steps to work out where Bee-Bot will end up once all the commands have been entered. Mark the destination point before running the program. Initially the programs should be only a few steps. The number of steps may be increased to develop the complexity of the challenges.
Key Focus 6 – Decomposition
In computational thinking, the word ‘decomposition’ means breaking a problem down into smaller more manageable parts. This is a good approach to most problem solving. When tackling challenges with Bee-Bot children should break the problem down into chunks. The example below shows a challenge where Bee-Bot needs to move to the farmhouse. This could be broken into 2 parts. Part 1 is the forward movement to the turn. Part 2 is the turn and the forward movement to the farmhouse.

Using the pause button between parts 1 and 2 will help children see the two stages more clearly and can aid any debugging.
More Free Downloadable Resources to Support Teaching and Learning with Bee-Bot:
- Bee-Bot Cross-Curricular Activity Ideas – Lots of fun ideas for using Bee-Bot to achieve learning goals across the curriculum.
- 12 Bee-Bot Pupil Challenge Cards – Fun Bee-Bot activities for pupils to complete independently or in pairs.
- 30 Bee-Bot Teacher Challenge Cards – Fun Bee-Bot activities for teachers to complete with groups of children.
- Bee-Bot App Guide – Written to support teachers with using the App and how to progress children’s learning through using the different modes and playing the games.
- Bee-Bot User Guide – A detailed guide designed to provide you with all the information you need to set up and begin using Bee-Bot.
- Bee-Bot Accessories Guide – A guide to all of our Bee-Bot accessories and how to use them to enhance the learning experience.
- Bee-Bot FAQs – Got a question about Bee-Bot? Look no further, our comprehensive set of frequently asked questions provides answers to lots of common queries regarding our bots.
Shop our full range of Bee-Bot resources here


