The Design and Technology primary curriculum specifies under the Technical Knoweldge section that pupils should understand and use mechanisms and mechanical systems both in KS1 and KS2.
These mechanisms or simple machines are simply devices that transfer a force or energy from one place to another. If you think about the pulley in your classroom blinds, your energy goes in to pulling the chain or string down (energy of force in) and the pulley transfers this to move the blind upwards (energy or force out).
One such machine that can be easily used for simple activities across KS1 and KS2 is the wheel and axle.
Below, I’ve shared three activities to explore the wheel and axle and the forces involved. Children love building cars and vehicles so these are all really fun to try out in the classroom, and most important of all, they’re simple for you too!
Here is a video of Laura Cross talking through each of the activities. More information and instructions are below:
1. Tube Cars
Challenge: Build a simple car to investigate turning at the wheel or the axle.
Suitable For: KS1 to KS2
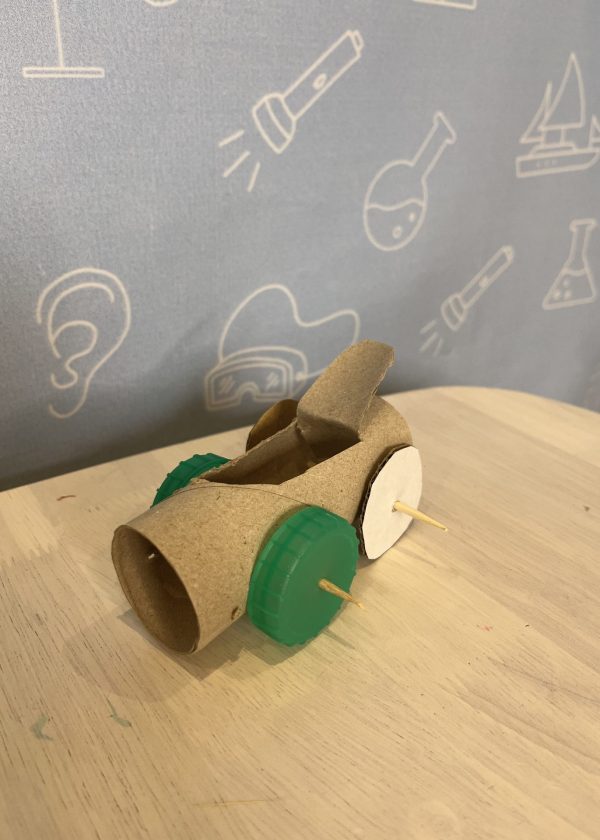
This is the simplest way to explore wheels and axles and you can do it really cheaply with some small cardboard tubes, wooden skewers and milk bottle tops or small circles cut out of cardboard. If you have some money to sped, you could use this dowel and wheel set which you can use again from year to year.
- If you aren’t using the dowel and wheel set, start by making a simple wheel and axle and talking about the different parts/ Take two bottle tops or small cardboard circles and use the pointed end of the skewer to poke holes in the centre of these two wheels. Then push the skewer all the way through so you have a wheel on each of its ends.
- Identify the different parts as the wheels and the axle. Next, tell pupils to turn the axle and ask what happens to the wheel and then to turn at the wheel and notice what happens to the axle. You can explain that in some wheels and axles the force goes into turning the axle (cars where the engine pushes around the axles, or ferris wheels) whereas in some wheels and axles, it’s the wheel where the force is applied (door handles, roundabouts, skateboards).
- Once they’ve explore their simple wheel and axle, they can put them into a simple car. Start by cutting a hole out the top of the tube so you can see inside. For younger children, you may need to do this part for them.
- Then poke two holes at either side at one of the tube to insert the skewer through. This is tricky to get right: they’ll need to line up the skewer parallel to the ground, parallel to the front of the car and also make sure the holes are low enough that the wheels will touch the floor. Once they’ve marked where their holes will go, they can poke them through with a skewer and put the wheels on each end. An adult might need to snap off the excess skewer for them.
- Repeat this for a second axle with two wheels at the other end of the tube. You will have your finished car and can add details to the car or decorate it.
Pupils will probably notice that this car can’t be pushed along so the wheels turn as there isn’t enough down force and drive to overcome the friction of the ground. However, they can play around with turning the axles through the hole in the tube to replicate how a car engine drives the axle in a real car.
2. Carousels
Challenge: Make a simple carousel
Suitable For: Year 2 (with help) to Year 6
You can take your wheel and axles making up a level with this simple way to build a carousel.
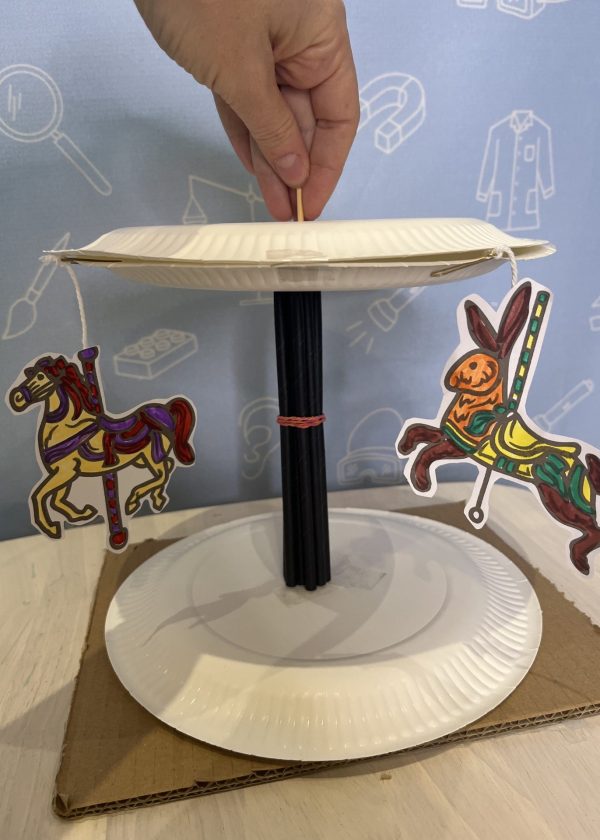
You’ll need paper plates, bottle tops or cardboard circles, paper straws, a skewer and some cardboard as a base, as well as tape and scissors.
- Start by using the skewer to poke holes in the middle of two bottle tops (or cardboard circles) and the three paper plates.
- Next, make the stand that will hold the carousel up by using a bunch of straws held tightly together to add strength. You’ll need to cut the straws so they’re about 2/3rd the length of your skewer otherwise you won’t have enough skewer sticking out the ends. Try to group the straws with one at the centre and the others gathered around it then tape them together tightly. You may need to use around 8-10 straws. Then poke the skewer through the central straw – this is your axle.
- Stick one bottle top down to your cardboard base making sure tape doesn’t cover the hole in the middle.
- Put the pointed end of the skewer down through a paper plate face down and then down into the bottle top stuck to the cardboard base. Add some tape to hold your straws securely t your paper plate at the bottom.
- Next put a paper plate face up on the top of your skewer and a bottle top above it to hold it in place. Add any more tape to hold the plate to the straws and the bottle top to the plate.
- Finally, add your third paper plate face down at the very top to finish it off cleanly. You can add in some carousel animals hanging down with string and paper clips from the top plates and add other details and decoration.
Once finished, pupils will be able to use the skewer at the top to turn their carousel, just like a real carousel has a motor to do this. If the carousel sticks, lift the whole thing a little off the base to leave a gap between the cardboard and the bottom plate.
3. Exploration Vehicles
Challenge: Power a vehicle with push power, elastic power, wind power or a spring
Suitable For: Year 4 to Year 6
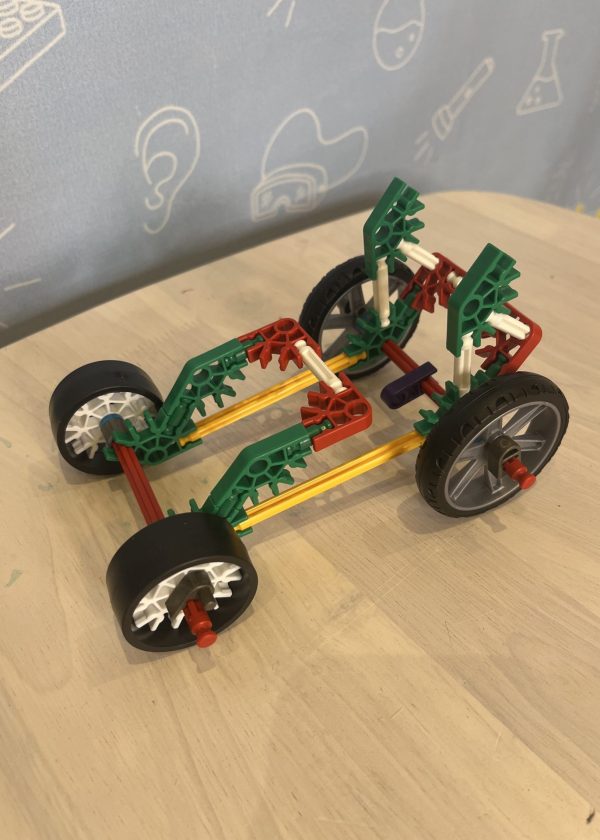
Using this STEM Explorations Vehicle Set is a great extension when you want to spend more time on wheels and axles. You can make it as simple or as complicated as you like with what you challenge pupils to build, how much instruction you give and using time limits for older pupils.
Not only will pupils be learning about and using wheels and axles in their vehicles, but they’ll be learning about the different ways that vehicles can be powered.
Of course they’ll also be working creatively, following instructions, problem solving and developing collaboration skills too when they work in groups.
The set comes with instructions for building 5 different kinds of vehicles and you could have pupils work in small groups with a kit at different times. More able pupils could be extended by providing a picture of the finished vehicle only. There are even questions to explore with the vehicles once they are built, such as investigating the effect of different sized wheels and axles or the overall length of the vehicle.
You may find, across all year groups, that some pupils are much more capable with this sort of task simply because they still take part in construction activities like Knex at home. This is exactly why it’s important to continue to provide these sorts of opportunities in school too.
If you’d like to try more engineering with your pupils, Inventors and Makers can help you set up your own after-school engineering club, provide STEM workshops and even train your staff on bringing engineering to their own classrooms.
With many thanks to Laura Cross for sharing this blog with us.
About the author:
Laura is a qualified and experienced primary teacher and STEM specialist who runs Inventors and Makers workshops, after-school clubs and CPD both virtually and in-person for schools all over the world. She wants to help teachers feel confident to teach engineering themselves and so allow pupils everywhere to experience the hands-on educational fun of engineering.