
Combining elements of science, technology and maths, the balloon buggy is a useful vehicle for giving pupils a taste of engineering and helps them to understand how things work. It also demonstrates Isaac Newton’s third law of motion: “For every action there is an equal and opposite reaction”

Follow this step-by-step guide on how to make a balloon buggy.
Associated Resources:
- Balloon Buggies Lesson Plan – Detailed lesson plan for teaching children how to make a balloon buggy.
- Balloon Buggies PowerPoint – Lesson PowerPoint to use alongside the lesson plan.
- Balloon Buggies Workbook – Workbook for pupils to complete as they work through the project.
What you’ll need
Parts

Tools and Consumables

- Ruler
- Pencil
- Craft knife
- Straight edge
- Cutting mat
- Secateurs
- Large scissor
- Sandpaper
- Low melt glue gun
- Felt tip pens
Step 1
Use the ruler and pencil to mark out a rectangle 10.5cm x 14.5cm on greyboard. Use the craft knife, straight edge and cutting mat to cut it out. This is the buggy base.
Step 2
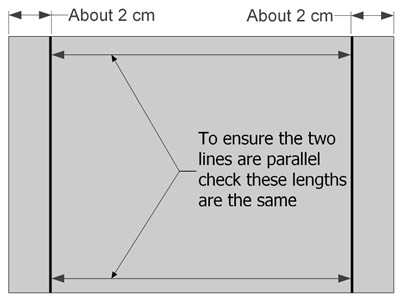
Decide which side of the buggy base you would like as the underside. Mark a line across the underside about 2cm from one end. Mark a second line about 2cm from the other end. Make sure this line is parallel to the first line.
 Step 3
 Step 3
Measure and mark two lengths of straw 12.5cm long and cut them off cleanly with the scissors. These are the bearings. The ends become flattened during cutting, so push the end of your pencil into the flattened end of the straw to make the end circular again so that the dowel can rotate easily inside the bearing. Put a line of glue across one of the lines you have drawn on the base. Hold a bearing by its ends and place it on the glue line. The ends should overlap the sides of the base by roughly 1 cm. Repeat for the second bearing.

Step 4
Measure and cut a 15m length of hose using the large scissors. (If you don’t have large scissors, you can cut the hose with secateurs). Turn the buggy base over. Work out where to attach the hose so that you can blow it up at one end and fit the balloon at the other. The hose should be slightly curved. Orientate the hose so that the ends are curved upwards to allow the balloon to go on. Glue the hose firmly to the top of the base.

Step 5
Measure and mark two 14.5cm lengths of dowel and cut them off with the secateurs. These are the axles. Use the sandpaper to smooth the very ends so that the wheels push on easily. Don’t sand the parts where the wheels will be positioned, as they need to fit tightly on the axle.

Step 6
Select four wheels and colour them in with the felt tip pens. Push one wheel onto each axle. Slide the axles into the bearings and then push on the second wheel. Slide the wheels along the axles until they almost touch the ends of the bearings. Don’t push them hard up against these as it will stop the axle turning – there needs to be a small gap.

Step 7
Hold the buggy base and spin the wheels with your finger. The axles should turn easily in the bearings. However, the wheels should not be loose on the axles – if they are you can glue them on.
If the axle doesn’t turn easily they try to work out why and correct it, for example if the wheels are pushed up hard against the bearings, then separate them a little.

Step 8
Make a passenger for your buggy using the pompom and googly eyes, and glue it on. Fit the balloon onto the hose.

Step 9
Blow up the balloon. Pinch the neck between your finger and thumb over the end of the hose. Place the buggy on a smooth flat floor and let go. If testing on a table, make sure there is someone ready to catch it!

Step 10
See if you can improve the range of your buggy (distance travelled before it stops), for example by blowing the balloon up more. If the balloon drags on the floor, you could try fitting an extension to the front of the buggy to support it. You could try fitting a different balloon to see if this improves performance.


Click here for a downloadable copy of the instructions for making a balloon buggy.
How else you can use the buggy?
- Compare how far the buggy goes when you try different balloon shapes, sizes and types or blow them up by different amounts. Consider modifying your design to keep the inflated balloon from touching the floor.
- Use tubes of different diameters to see if it affects the range and speed of the buggy.
- You can use your buggy to demonstrate energy storage and transfer, forces and motion, friction and reducing friction.
- Why not remove the balloon, put the buggy on a ramp and use a protractor to measure the ramp angle at which it starts to roll? You can then tape the middle of the axles to the buggy base to stop them rotating, and compare the angle at which the buggy starts to slide down, to compare rolling resistance with sliding resistance.
- Finally you can cut tyres from bicycle inner tubes or balloons, stretch them over the wheels and compare the angle at which the buggy slides with tyres. This demonstrates why cars have rubber tyres to help them grip the road!
About our guest author
Caroline Alliston, is a professional engineer and technical author with a degree from Cambridge and twenty four years experience in industry. Whilst on a career break to spend more time with her two boys, she started a club at their school to enthuse children about science and engineering. Before long there were more children on the waiting list than in the actual club!
Caroline now spends her time running hugely popular workshops for teachers, pupils, home educated children, holiday clubs, Scout groups etc. Unable to be in three places at once, she has written the Technology for Fun series of books incorporating her favourite and most successful projects, to give even more children the opportunity to have fun making things that really work.

